Skimage库使用
前言
最近发现Skimage库挺好用的,可以和OpenCV搭配一起使用,让图像处理更加灵活和方便。
本博客只对Skimage库做简单的介绍,细节使用的话推荐官网查看或百度寻找。Skimage官方网站
本博客会不断更新的,尽量。
实现连通区域染色
源代码程序:
import cv2
from skimage import measure, color
path = "C:\\Users\\17513\\Desktop\\test.jpg"
img = cv2.imread(path)
img_copy = img.copy()
img_gray = cv2.cvtColor(img, cv2.COLOR_BGR2GRAY)
img_gauss = cv2.GaussianBlur(img_gray, (5, 5), 1)
img_temp = cv2.threshold(img_gray, 127, 255, cv2.THRESH_BINARY)[1]
labels = measure.label(img_temp)
dst = color.label2rgb(labels, bg_label=0)    # bg_label=0要有,不然会有警告
cv2.imshow("666", dst)
cv2.waitKey(0)
cv2.destroyAllWindows()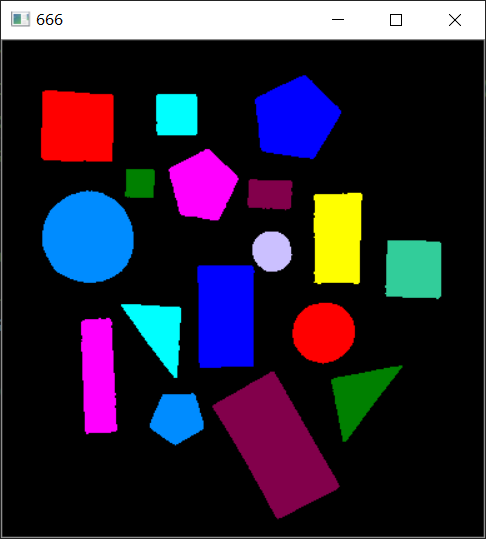
代码函数分析:
这段代码很少,其中需要讲解的只有 measure.label和color.label2rgb,其他均为OpenCV的基础代码。
skimage.measure.label
功能描述:实现连通区域标记。
函数调用形式:skimage.measure.label(input, neighbors = None, background = None, return_num = False, connectivity =None)
参数描述:
input : Image to label 需要被标记的图片,输入的数据结构不作要求
neighbors : 这个参数将被移除,被下面的connectivity替代。可以忽略不看
background : 选择背景像素,指定像素作为背景,全部相同像素标记为0
return_num : 是一个bool值,如果为True的话返回值是一个元组(labels ,num );如果为False的话就只返回labels
connectivity : Maximum number of orthogonal hops to consider a pixel/voxel as a neighbor. Accepted values are ranging from 1 to input.ndim. If None, a full connectivity of input.ndim is used. [int, optional]。如果input是一个二维的图片,那么connectivity的值范围选择{1,2},如果是None则默认是取最高的值,对于二维来说,当connectivity=1时代表4连通,当connectivity=2时代表8连通.
Returns:
labels : 和input形状一样,但是数值是标记号,所以这是一个已经标记的图片
num : 标记的种类数,如果输出0则只有背景,如果输出2则有两个种类或者说是连通域skimage.color.label2rgb
Parameters
labelarray, shape (M, N)
Integer array of labels with the same shape as image.imagearray, shape (M, N, 3), optional
Image used as underlay for labels. If the input is an RGB image, it’s converted to grayscale before coloring.colorslist, optional
List of colors. If the number of labels exceeds the number of colors, then the colors are cycled.alphafloat [0, 1], optional
Opacity of colorized labels. Ignored if image is None.bg_labelint, optional
Label that’s treated as the background. If bg_label is specified, bg_color is None, and kind is overlay, background is not painted by any colors.bg_colorstr or array, optional
Background color. Must be a name in color_dict or RGB float values between [0, 1].image_alphafloat [0, 1], optional
Opacity of the image.kindstring, one of {‘overlay’, ‘avg’}
The kind of color image desired. ‘overlay’ cycles over defined colors and overlays the colored labels over the original image. ‘avg’ replaces each labeled segment with its average color, for a stained-class or pastel painting appearance.saturationfloat [0, 1], optional
Parameter to control the saturation applied to the original image between fully saturated (original RGB, saturation=1) and fully unsaturated (grayscale, saturation=0). Only applies when kind=’overlay’.Returns
resultarray of float, shape (M, N, 3)
The result of blending a cycling colormap (colors) for each distinct value in label with the image, at a certain alpha value.这段关于
color.label2rgb是直接复制官网上的。大部分参数都保持默认即可,与measure.label结合使用可以达到对不同连通区域染色的效果。
Skimage.measure.regionprops介绍
Skimage.measure.regionprops
功能描述:测量标记图像区域的属性。
函数调用形式:skimage.measure.regionprops(label_image, intensity_image=None, cache=True, coordinates=None)
参数描述:
label_image:(N,M)ndarray,标记输入图像;
intensity_image : (N, M) ndarray,可选参数,具有与标记图像相同大小的强度(即输入)图像,默认值为“None”;
cache:bool,可选参数,确定是否缓存计算的属性。对于缓存属性,计算速度要快得多,而内存消耗则会增加;
coordinates:’rc’或’xy‘,可选参数,协调2D图像的约定。(3D图像仅支持’rc‘坐标)
Return:
region:是一种列表的形式,每个连通域的标记区域。
这个函数返回值是一个列表,内容是每个没标记的连通区域。
| 属性名称 | 类型 | 描述 |
|---|---|---|
| area | int | 区域内像素点总数 |
| bbox | tuple | 边界外接框(min_row, min_col, max_row, max_col) |
| centroid | array | 质心坐标 |
| convex_area | int | 凸包内像素点总数 |
| convex_image | ndarray | 和边界外接框同大小的凸包 |
| coords | ndarray | 区域内像素点坐标 |
| Eccentricity | float | 离心率 |
| equivalent_diameter | float | 和区域面积相同的圆的直径 |
| euler_number | int | 区域欧拉数 |
| extent | float | 区域面积和边界外接框面积的比率 |
| filled_area | int | 区域和外接框之间填充的像素点总数 |
| perimeter | float | 区域周长 |
| label | int | 区域标记 |
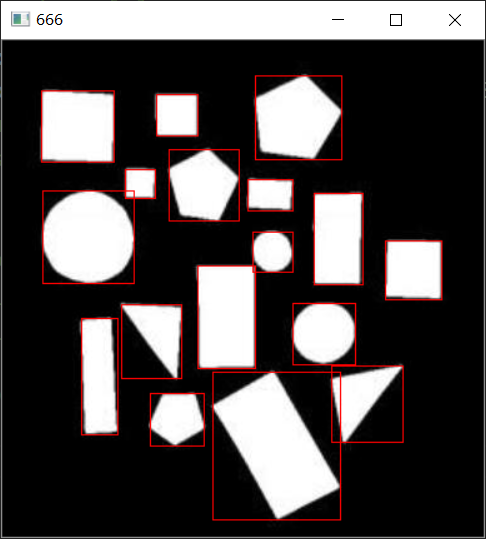
源程序代码:
import cv2
from skimage import measure
path = "C:\\Users\\17513\\Desktop\\test.jpg"
img = cv2.imread(path)
img_copy = img.copy()
img_gray = cv2.cvtColor(img, cv2.COLOR_BGR2GRAY)
img_gauss = cv2.GaussianBlur(img_gray, (5, 5), 1)
img_temp = cv2.threshold(img_gray, 127, 255, cv2.THRESH_BINARY)[1]
labels = measure.label(img_temp)
a = measure.regionprops(labels)
for (j, i) in enumerate(a):
    (min_row, min_col, max_row, max_col) = i.bbox
    cv2.rectangle(img_copy, (min_col, min_row), (max_col, max_row), (0, 0, 255))
cv2.imshow("666", img_copy)
cv2.waitKey(0)
cv2.destroyAllWindows()