OpenCV实现连通区域填充
前言
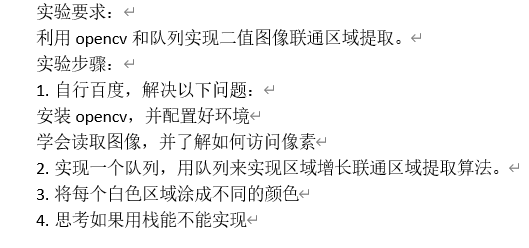
本博客主要解决的问题来源于数据结构老师的一次作业,作业内容如下图所示。
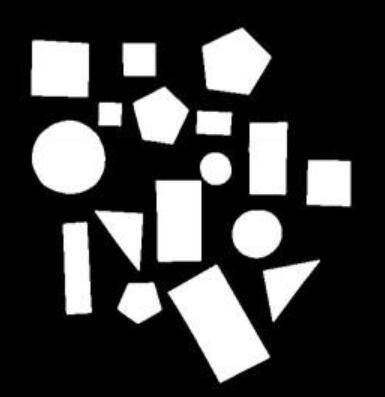
要处理的图像如下:
环境配置
- VS2019
- C++
- OpenCV-4.1.0
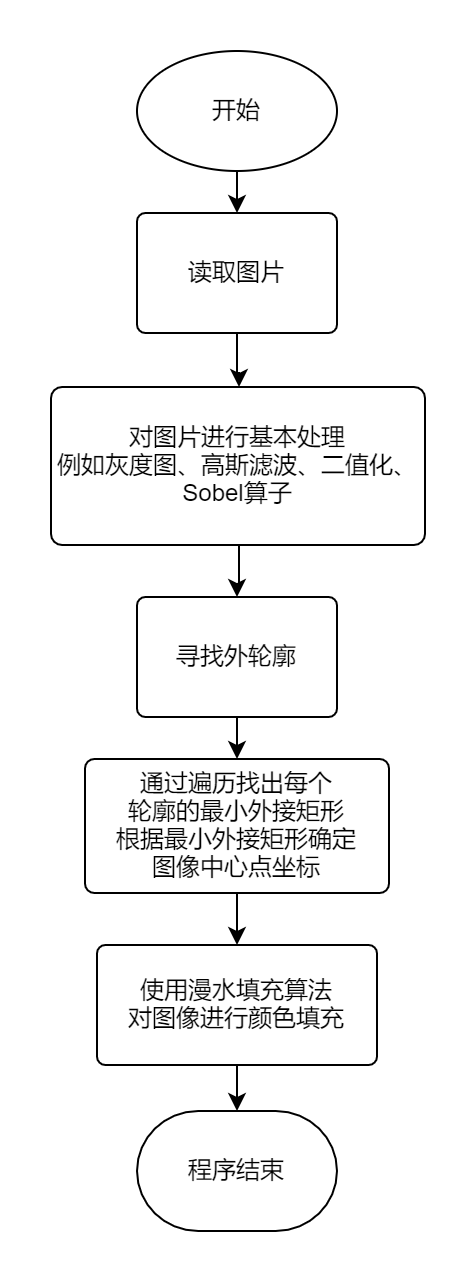
第一部分:使用轮廓查找和漫水填充的方法实现区域染色
流程图:
源程序代码:
void deal_test_1()
{
    Mat test_1_gray, test_1_threshold, test_1_gauss;
    Mat test_1_sobelx, test_1_sobely, test_1_sobelxy;
    Mat test_1_origin = imread("C:\\Users\\17513\\Desktop\\数据结构报告\\栈和队列\\test.jpg");
    Mat test_1_copy = test_1_origin.clone();
    /*转换为灰度图*/
    cvtColor(test_1_origin, test_1_gray, COLOR_BGR2GRAY);
    /*高斯滤波*/
    GaussianBlur(test_1_gray, test_1_gauss, Size(5, 5), 0, 0);
    /*二值化*/
    threshold(test_1_gauss, test_1_threshold, 127, 255, THRESH_BINARY);
    /*Sobel算子*/
    Sobel(test_1_threshold, test_1_sobelx, CV_64F, 1, 0, 3);
    convertScaleAbs(test_1_sobelx, test_1_sobelx);
    Sobel(test_1_threshold, test_1_sobely, CV_64F, 0, 1, 3);
    convertScaleAbs(test_1_sobely, test_1_sobely);
    addWeighted(test_1_sobelx, 1, test_1_sobely, 1, 0, test_1_sobelxy);
    /*再次二值化*/
    threshold(test_1_sobelxy, test_1_threshold, 127, 255, THRESH_BINARY);
    /*寻找轮廓*/
    vector<vector<Point>> contours;
    findContours(test_1_threshold, contours, RETR_EXTERNAL, CHAIN_APPROX_NONE);
    /*最小外接矩形*/
Point2f rect[4];
vector<Rect> boundRect(contours.size());  //定义外接矩形集合
    vector<RotatedRect> box(contours.size()); //定义最小外接矩形集合
    srand((int)time(0));
    for (int i = 0; i < contours.size(); i++)
    {
        box[i] = minAreaRect(Mat(contours[i]));  //计算每个轮廓最小外接矩形
        box[i].points(rect);  //把最小外接矩形四个端点复制给rect数组
        floodFill(test_1_copy, Point(box[i].center.x, box[i].center.y), Scalar(rand() % 255, rand() & 255, rand() % 255), &boundRect[i], Scalar(20, 20, 20), Scalar(20, 20, 20));
    }
    cv_show("666", test_1_copy);
}
代码分析:
- 这部分代码比较基础。首先对图片进行基本的处理,再使用轮廓查找的方式找的图形的轮廓。再通过轮廓算出其最小外接矩形,这样就可以大致确定每个图形所在的区域,也就是ROI区域。
- 在获取ROI区域后的难点是如何对图像进行染色,而且还要保证每个图形染的颜色是不同的。
对于染色方法我这里使用的是漫水填充的算法。这个算法参考
【OpenCV入门教程之十五】水漫金山:OpenCV漫水填充算法(Floodfill)
具体函数的使用方法也比较简单。函数需要提供seedPoint即漫水填充算法的起点,在程序中这个点我给的是每个图像最小外接矩形的中心点。此外还需要提供填充的颜色,为了保证颜色的不同,采用随机数的方式选择不用的BGR颜色,随机数的范围是0到255.
效果图:
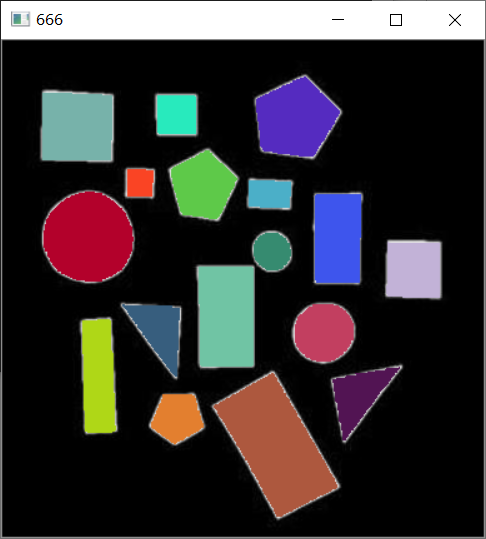 \
\
程序最终效果还可以接受,但有些图形的外边明显没有进行染色,这可能是因为图像经过基本处理后发生改变与原图像不同导致。
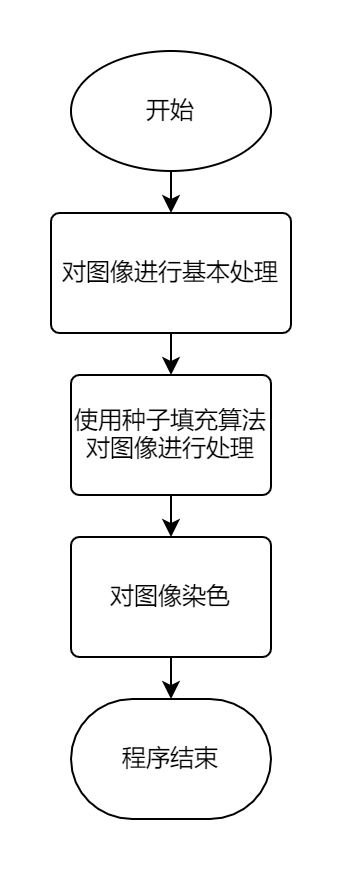
第二部分:使用队列实现种子填充法
流程图:
源程序代码:
基本的图像处理:
Mat labelImg;
Mat colorLabelImg;
Mat test_1_gray, test_1_threshold, test_1_gauss;
Mat test_1_origin = imread("C:\\Users\\17513\\Desktop\\数据结构报告\\栈和队列\\test.jpg");
Mat test_1_copy;
cvtColor(test_1_origin, test_1_gray, COLOR_BGR2GRAY);
GaussianBlur(test_1_gray, test_1_gauss, Size(5, 5), 0, 0);
threshold(test_1_gauss, test_1_threshold, 127, 255, THRESH_BINARY);
代码分析:
一些基本的图像处理。灰度图、高斯滤波和二值化。
种子填充法相关代码:
void SeedFillOld(const Mat& binImg, Mat& lableImg)
{
    if (binImg.empty() || binImg.type() != CV_8UC1)
    {
        return;
    }

    lableImg.release();
    binImg.convertTo(lableImg, CV_32SC1);

    int label = 1;

    int rows = binImg.rows;
    int cols = binImg.cols;
    for (int i = 0; i < rows; i++)
    {
        for (int j = 0; j < cols; j++)
        {
            if (lableImg.at<int>(i, j) == 255)
            {
                queue<pair<int, int>> neighborPixels;
                neighborPixels.push(pair<int, int>(i, j));     // 像素位置: <i,j>
                ++label;
                while (!neighborPixels.empty())
                {
                    pair<int, int> curPixel = neighborPixels.front();
                    int curX = curPixel.first;
                    int curY = curPixel.second;
                    if (lableImg.at<int>(curX, curY) != label)
                    {
                        lableImg.at<int>(curX, curY) = label;

                        neighborPixels.pop();

                        if (lableImg.at<int>(curX, curY - 1) == 255)
                        {
                            neighborPixels.push(std::pair<int, int>(curX, curY - 1));
                        }
                        if (lableImg.at<int>(curX, curY + 1) == 255)
                        {
                            neighborPixels.push(std::pair<int, int>(curX, curY + 1));
                        }
                        if (lableImg.at<int>(curX - 1, curY) == 255)
                        {
                            neighborPixels.push(std::pair<int, int>(curX - 1, curY));
                        }
                        if (lableImg.at<int>(curX + 1, curY) == 255)
                        {
                            neighborPixels.push(std::pair<int, int>(curX + 1, curY));
                        }
                    }
                    else
                    {
                        neighborPixels.pop();
                    }
                }
            }
        }
    }
}
代码分析:
- 种子填充法
参考博客:
OpenCV_连通区域分析(Connected Component Analysis-Labeling)
OpenCV-二值图像连通域分析
在上面这两个博客中的种子填充法都是使用堆栈来实现的,因此在本程序中需要考虑换成队列。 - 算法的简单分析:
(1) 首先需要获取原图像的列数和行数方便后面对每个像素点的访问。
(2) 通过遍历访问像素点,如果像素点(i, j)的值等于255(白色点)则将其坐标点存入neighborPixels队列中,并且标签label加1。
(3) 如果neighborPixels队列非空,则取出neighborPixels队列的队头。判断队头代表的像素点是否与当前label相等,如果相等则直接删除并重复步骤(3),否则进行步骤(4)。如果neighborPixels队列为空则执行步骤(2)。
(4) 将队头点赋值为label并从队列中删除。对队头点进行4领域判断。上下左右四个点,哪个点的像素值为255哪个值就入队。重复步骤(3)。
(5) 当所有像素点被遍历完之后种子填充法结束。 - 种子填充法比较容易理解,我认为难点在于将原本代码中的堆栈转换为队列。经过仔细分析,发现如果仅仅是把堆栈换成队列会导致代码重复,及会出现一个像素点被多次访问的情况。为了解决这个问题,我在程序中多加了一个判断(第135行)。因为一个像素点被访问后会被“贴上”值为label的“标签”,所以对像素点的“标签”进行判断就可以知道这个点有没有被访问过。如果访问过则直接删除,否则正常执行程序即可。
- 本程序中使用的是4领域,还可以换成8领域,不过我没试过,不知道效果怎么样。
第三部分:对图像染色
源程序代码:
Scalar GetRandomColor()
{
    uchar r = 255 * (rand() / (1.0 + RAND_MAX));
    uchar g = 255 * (rand() / (1.0 + RAND_MAX));
    uchar b = 255 * (rand() / (1.0 + RAND_MAX));
    return Scalar(b, g, r);
}

void LabelColor(const Mat& labelImg, Mat& colorLabelImg)
{
    int num = 0;
    if (labelImg.empty() ||
        labelImg.type() != CV_32SC1)
    {
        return;
    }

    map<int, Scalar> colors;

    int rows = labelImg.rows;
    int cols = labelImg.cols;

    colorLabelImg.release();
    colorLabelImg.create(rows, cols, CV_8UC3);
    colorLabelImg = Scalar::all(0);

    for (int i = 0; i < rows; i++)
    {
        const int* data_src = (int*)labelImg.ptr<int>(i);
        uchar* data_dst = colorLabelImg.ptr<uchar>(i);
        for (int j = 0; j < cols; j++)
        {
            int pixelValue = data_src[j];
            if (pixelValue > 1)
            {
                if (colors.count(pixelValue) <= 0)
                {
                    colors[pixelValue] = GetRandomColor();
                    num++;
                }

                Scalar color = colors[pixelValue];
                *data_dst++ = color[0];
                *data_dst++ = color[1];
                *data_dst++ = color[2];
            }
            else
            {
                data_dst++;
                data_dst++;
                data_dst++;
            }
        }
    }
    printf("color num : %d \n", num);
}
代码分析:
- 颜色BGR也是取的随机数,可以保证每个区域颜色不同。
- 通过遍历进行染色,判断方式就是对每个像素点的值也就是标签进行染色。同一个标签的点染同一个颜色。
效果图:

从图中可以看出,效果比轮廓法要好,颜色填充比较饱满。
完整代码:
#include <opencv2/opencv.hpp>
#include <iostream>
#include <string>
#include <queue>
#include <stack>
#include <map>
#include <list>
using namespace cv;
using namespace std;

void cv_show(string name, Mat img)
{
	/*用于显示图像*/
	imshow(name, img);
	waitKey(0);
}

void deal_test_1()
{
	Mat test_1_gray, test_1_threshold, test_1_gauss;
	Mat test_1_sobelx, test_1_sobely, test_1_sobelxy;
	Mat test_1_origin = imread("C:\\Users\\17513\\Desktop\\数据结构报告\\栈和队列\\test.jpg");
	Mat test_1_copy = test_1_origin.clone();
	/*转换为灰度图*/
	cvtColor(test_1_origin, test_1_gray, COLOR_BGR2GRAY);
	/*高斯滤波*/
	GaussianBlur(test_1_gray, test_1_gauss, Size(5, 5), 0, 0);
	/*二值化*/
	threshold(test_1_gauss, test_1_threshold, 127, 255, THRESH_BINARY);
	/*Sobel算子*/
	Sobel(test_1_threshold, test_1_sobelx, CV_64F, 1, 0, 3);
	convertScaleAbs(test_1_sobelx, test_1_sobelx);
	Sobel(test_1_threshold, test_1_sobely, CV_64F, 0, 1, 3);
	convertScaleAbs(test_1_sobely, test_1_sobely);
	addWeighted(test_1_sobelx, 1, test_1_sobely, 1, 0, test_1_sobelxy);
	/*再次二值化*/
	threshold(test_1_sobelxy, test_1_threshold, 127, 255, THRESH_BINARY);
	/*寻找轮廓*/
	vector<vector<Point>> contours;
	findContours(test_1_threshold, contours, RETR_EXTERNAL, CHAIN_APPROX_NONE);
	/*绘制轮廓*/
	//drawContours(test_1_copy, contours, -1, Scalar(0, 255, 255), 2);
	/*最小外接矩形*/
	Point2f rect[4];
	vector<Rect> boundRect(contours.size());  //定义外接矩形集合
	vector<RotatedRect> box(contours.size()); //定义最小外接矩形集合
	srand((int)time(0));
	for (int i = 0; i < contours.size(); i++)
	{
		box[i] = minAreaRect(Mat(contours[i]));  //计算每个轮廓最小外接矩形
		//boundRect[i] = boundingRect(Mat(contours[i]));
		//circle(test_1_copy, Point(box[i].center.x, box[i].center.y), 2, Scalar(0, 255, 0), -1, 8);
		//绘制最小外接矩形的中心点
		/*rectangle(test_1_copy, Point(boundRect[i].x, boundRect[i].y), Point(boundRect[i].x +
			boundRect[i].width, boundRect[i].y + boundRect[i].height), Scalar(0, 255, 0), 1, 8);*/
		box[i].points(rect);  //把最小外接矩形四个端点复制给rect数组
		floodFill(test_1_copy, Point(box[i].center.x, box[i].center.y), Scalar(rand() % 255, rand() & 255, rand() % 255), &boundRect[i], Scalar(20, 20, 20), Scalar(20, 20, 20));
	}
	cv_show("666", test_1_copy);
}

void deal_test_2()
{
	Mat img_origin = imread("C:\\Users\\17513\\Desktop\\数据结构报告\\栈和队列\\test2.jpg");
	Mat img_copy = img_origin.clone();
	Mat img_gray, img_gauss, img_threshold;
	Mat img_sobelx, img_sobely, img_sobelxy;
	Mat dstImage;
	Mat element = getStructuringElement(MORPH_RECT, Size(3, 3));
	cvtColor(img_copy, img_gray, COLOR_BGR2GRAY);
	GaussianBlur(img_gray, img_gauss, Size(5, 5), 0, 0);
	threshold(img_gray, img_threshold, 127, 255, THRESH_BINARY);
	morphologyEx(img_threshold, dstImage, 0, element);
	//Sobel(dstImage, img_sobelx, CV_64F, 1, 0, 3);
	//convertScaleAbs(img_sobelx, img_sobelx);
	//Sobel(img_threshold, img_sobely, CV_64F, 0, 1, 3);
	//convertScaleAbs(img_sobely, img_sobely);
	//addWeighted(img_sobelx, 1, img_sobely, 1, 0, img_sobelxy);
	threshold(dstImage, img_threshold, 127, 255, THRESH_BINARY);
	vector<vector<Point>> contours;
	vector<vector<Point>> cnts;
	vector<vector<Point>> cnts_max;
	findContours(img_threshold, contours, RETR_EXTERNAL, CHAIN_APPROX_NONE);
	for (int i = 0; i < contours.size(); i++)
	{
		double size = contourArea(contours[i]);
		if (size >= 10 && size < 1000)
			cnts.push_back(contours[i]);
		if (size >= 1000)
			cnts_max.push_back(contours[i]);
		// cout << i << "=" << size << endl;
	}
	Mat img_copy2 = img_copy.clone();
	int sum;
	sum = cnts.size() + cnts_max.size() * 2;
	drawContours(img_copy2, cnts, -1, Scalar(0, 0, 255), 1);
	//drawContours(img_copy, cnts, -1, Scalar(0, 0, 255), 2);
	//cout << "contours = " << contours.size() << endl;
	//cout << "cnts = " << cnts.size() << endl;
	//cout << "cnts_max = " << cnts_max.size() << endl;
	cout << "sum = " << sum << endl;
	//cout << "一共有" << cnts.size() << "个米粒" << endl;
	imshow("米粒轮廓", img_copy2);
	waitKey(0);
}

void SeedFillOld(const Mat& binImg, Mat& lableImg)
{
	if (binImg.empty() || binImg.type() != CV_8UC1)
	{
		return;
	}

	lableImg.release();
	binImg.convertTo(lableImg, CV_32SC1);

	int label = 1;

	int rows = binImg.rows;
	int cols = binImg.cols;
	for (int i = 0; i < rows; i++)
	{
		for (int j = 0; j < cols; j++)
		{
			if (lableImg.at<int>(i, j) == 255)
			{
				queue<pair<int, int>> neighborPixels;
				neighborPixels.push(pair<int, int>(i, j));     // 像素位置: <i,j>
				++label;
				while (!neighborPixels.empty())
				{
					pair<int, int> curPixel = neighborPixels.front();
					int curX = curPixel.first;
					int curY = curPixel.second;
					if (lableImg.at<int>(curX, curY) != label)
					{
						lableImg.at<int>(curX, curY) = label;

						neighborPixels.pop();

						if (lableImg.at<int>(curX, curY - 1) == 255)
						{
							neighborPixels.push(std::pair<int, int>(curX, curY - 1));
						}
						if (lableImg.at<int>(curX, curY + 1) == 255)
						{
							neighborPixels.push(std::pair<int, int>(curX, curY + 1));
						}
						if (lableImg.at<int>(curX - 1, curY) == 255)
						{
							neighborPixels.push(std::pair<int, int>(curX - 1, curY));
						}
						if (lableImg.at<int>(curX + 1, curY) == 255)
						{
							neighborPixels.push(std::pair<int, int>(curX + 1, curY));
						}
					}
					else
					{
						neighborPixels.pop();
					}
				}
			}
		}
	}
}

Scalar GetRandomColor()
{
	uchar r = 255 * (rand() / (1.0 + RAND_MAX));
	uchar g = 255 * (rand() / (1.0 + RAND_MAX));
	uchar b = 255 * (rand() / (1.0 + RAND_MAX));
	return Scalar(b, g, r);
}

void LabelColor(const Mat& labelImg, Mat& colorLabelImg)
{
	int num = 0;
	if (labelImg.empty() ||
		labelImg.type() != CV_32SC1)
	{
		return;
	}

	map<int, Scalar> colors;

	int rows = labelImg.rows;
	int cols = labelImg.cols;

	colorLabelImg.release();
	colorLabelImg.create(rows, cols, CV_8UC3);
	colorLabelImg = Scalar::all(0);

	for (int i = 0; i < rows; i++)
	{
		const int* data_src = (int*)labelImg.ptr<int>(i);
		uchar* data_dst = colorLabelImg.ptr<uchar>(i);
		for (int j = 0; j < cols; j++)
		{
			int pixelValue = data_src[j];
			if (pixelValue > 1)
			{
				if (colors.count(pixelValue) <= 0)
				{
					colors[pixelValue] = GetRandomColor();
					num++;
				}

				Scalar color = colors[pixelValue];
				*data_dst++ = color[0];
				*data_dst++ = color[1];
				*data_dst++ = color[2];
			}
			else
			{
				data_dst++;
				data_dst++;
				data_dst++;
			}
		}
	}
	printf("color num : %d \n", num);
}

void deal_test_3()
{
	Mat labelImg;
	Mat colorLabelImg;
	Mat test_1_gray, test_1_threshold, test_1_gauss;
	Mat test_1_origin = imread("C:\\Users\\17513\\Desktop\\数据结构报告\\栈和队列\\test.jpg");
	Mat test_1_copy;
	cvtColor(test_1_origin, test_1_gray, COLOR_BGR2GRAY);
	GaussianBlur(test_1_gray, test_1_gauss, Size(5, 5), 0, 0);
	threshold(test_1_gauss, test_1_threshold, 127, 255, THRESH_BINARY);
	SeedFillOld(test_1_threshold, labelImg);
	LabelColor(labelImg, colorLabelImg);
	cv_show("666", colorLabelImg);
}

int main()
{
	int mode;
	cout << "请输入要执行的程序编号:";
	cin >> mode;
	if (mode == 1)
		deal_test_1();
	else if (mode == 2)
		deal_test_2();
	else if (mode == 3)
		deal_test_3();
	else
		cout << "请输入正确的编号!" << endl;
	return 0;
}